Window Delayed Write Failed ? Solutions are here!
This topic is researched, tested and written by Amir Hossein Moradi.
This is the third article on the Windows Delayed Write Failed error occurring with hard drives (mostly external ones with USB/Firewire/Network connections). On 28th December 2007, I wrote the Windows – Delayed Write Failed – Solved! article which had more than 190,000 views, and helped many users till date. On 9th June 2008, the second article on this topic – Windows Delayed Write Failed – Latest Solution – which had more than 34,000 views till date, was out and is still getting many users out of trouble.
Now, it’s time to write the 3rd article and sum up all possible solutions for the Windows Delayed Write Failed error.
 About Delayed Write:
Windows uses a special subsystem for certain disk functions, which caches write operations and performs them when the system is idle. This can improve system performance, but it’s typically turned off by default. The term for this kind of operation is “delayed writing”.
You can see how write-caching is handled for a particular volume by right-clicking on the icon for the drive in the “Disk drives” subtree of the Device Manager and selecting the Policies tabs. The options typically are “Optimize for quick removal” (everything is written to the drive immediately) and “Optimize for performance” (writes are cached).
 About the error:
“Windows Delayed Write Failed” error occurs usually when the caching process gets interrupted or the files to be cached get corrupted, either because of a drive failure, a cable failure, or a USB interface fail!
This error might happen to brand new drives as well as good working old ones.
 Cause:
This error might be caused by several factors:
- Cache settings
- System Restore settings
- Device drivers
- Media error, drive failure
- USB/Firewire host controllers
- Drive overheating
- Mis-configured BIOS settings
- Ultra Direct Memory Access (UDMA) mis-configuration
- Unmatched cables
- Faulty cables
- Memory parity conflict
- Power management drivers
 Resolutions:
Here are different resolutions to the problem, I’ve arranged them in such a way that the most probable and easy to apply is at the top of the list. Read all resolutions carefully before any attempt on your drive(s) and/or computer(s).
1. System Restore Settings:
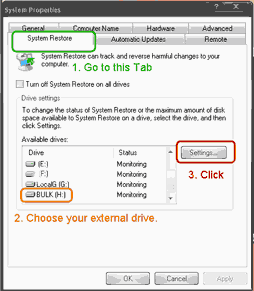
Users reported that Windows might try to write system restore data on the external drive, or try to monitor the drive in case of a system crash. This procedure might be a cause for the Delayed Write Failed error. What to do is quite simple. Just follow this photo tutorial:
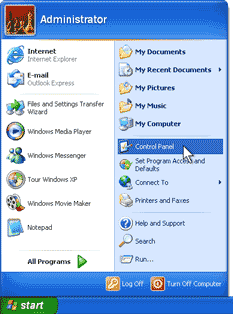
Open your Control Panel:
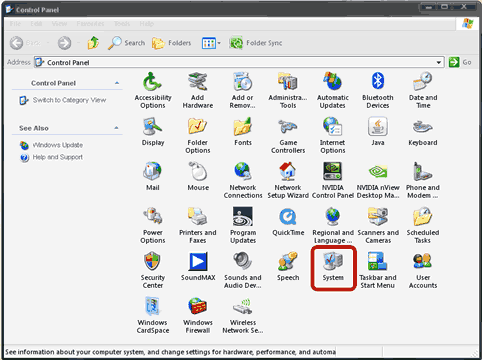
Open System:
Go to System Restore tab, choose your external drive, and click the Settings button:
Check the Turn off System Restore on this drive checkbox and click OK:
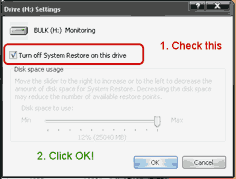
Now, you need to restart your computer, and if System Restore configuration was the issue, it should be solved.
2. Device drivers:
Some older RAID device drivers are known to cause the Write Delayed Failed issue, so do check with you hardware manufacturer for the latest device drivers.
I suggest that you check for:
- latest RAID drivers for your hardware,
- latest BIOS for your motherboard,
- latest chipset drivers,
- latest USB hub (host controller) drivers,
- latest graphics card drivers.
3. Overheating:
First thing to try is to see if your drive is not over heating!
According to Seagate, “the operating temperature range for most Seagate hard drives is 5 to 50 degrees Celsius”.[5]
This is true for most of hard drives on the market, either you have a Maxtor, Seagate, Samsung, Western Digital or other brands of hard drive, you should keep it under 50 degrees Celsisus ( equivalent to 122 degrees Fahrenheit)
4. Faulty cables:
Check your cables!
Old USB (or FireWire) cables, can be faulty and cause packet loss. Faulty cables can cause severe damage to your hardware, so check your cables and it’s recommended that you buy some new and good quality cables.
5. Unmatched cables:
Check your cables, again!
If you got an IDE drive, then you should check the connector to be the right one! You are using a 40-wire connector cable to connect the UDMA drive to the controller instead of the required 80-wire, 40-pin cable! Fix this and you should be finished.
Read this article from Microsoft: You receive an error message when you save or move documents in Windows XP: “Delayed Write Failed”
6. Mis-configured BIOS settings:
When your computer starts, click the “Del” button (or F2) to go to the BIOS Setup of your motherboard. (Check your motherboard documentation for a detailed how-to).
“This error typically occurs when the “Enable write caching on the disk” feature for your hard disk is turned on.
However, if the “Enable write caching on the disk” feature is turned off, this error can occur because the Ultra Direct Memory Access (UDMA) hard disk controller may be configured in either of the following ways:
– You are using a 40-wire connector cable to connect the UDMA drive to the controller instead of the required 80-wire, 40-pin cable.
– The BIOS settings are configured to force faster UDMA modes.” [6]
so, check for Ultra Direct Memory Access (UDMA) mis-configuration!
7. Cache settings:
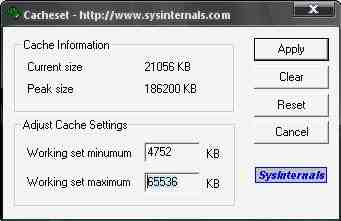
As described in my previous article, Windows Delayed Write Failed – Latest Solution , incorrect cache settings may cause the Write Delayed Failed error to occur, so you should check the cache settings for your computer and controllers. Read the article to find out all the details.
8. USB/Firewire host controllers:
After a lot of research on the Write Delayed Failed issue with different types and brands of hard drives on different PCs, I’ve come to the conclusion that, this error is usually caused by the USB/Firewire Host Controller, which is usually built-in on the motherboard.
To rectify this error, you should buy a recent PCI USB expansion card and add it to your PC. These cards cost around 20$ and are easy to install and need usually no specific configuration. But you should know that once you installed a PCI USB card, you should connect your hard drive only to this card’s USB ports.
Remember to not connect your drive to a faulty USB hub, and avoid external USB hubs without power supply adapter.
9. Media error, drive failure:
This is one of the worst case senarios. As hard disk drives are mechanical parts of your computer, they may go faulty and fail some day. You might want to do a hard disk check to find out the overall health of your drive. Checking a drive for bad sectors, or checking with the Spin Rite tool (https://grc.com/), and also using the S.M.A.R.T. technology to determine the overall perfomances and health status of a drive are recommended.
Use your favorite search engine, to find a free S.M.A.R.T. monitor tool which will tell you about the drive’s health.
10. Memory parity conflict:
Even if this is one of the most rare causes to the Windows Delayed Write Failed error, but it should not be left out. In older motherboards, if the error message appears after you’ve inserted a new RAM, the incompatibility of the new RAM with the older one(s) might cause this type of errors. In this case, I would recommend that you check for memory compatibility and use the same BUS when matching RAMs. You may want to consider upgrading to recent hardware.
11. Power Management drivers:
As mentioned by some users, in some cases, disabling the Power Management feature of Windows, solves the issue. To do so, go to “Control Panel”, go to “Power Options” and set the “Turn off hard disks” to “Never”. Disable Power management softwares if you can to see if that solves the issue.
References:
1- Great comments from Gibni’s Visitors!
2 – https://gibni.com/technology/windows-delayed-write-failed-solved/
3- https://gibni.com/technology/windows-delayed-write-failed-2/
4- https://searchwinit.techtarget.com/tip/0,289483,sid1_gci1041334,00.html
5- https://www.tomshardware.co.uk/forum/page-261614_10_0.html
6- https://support.microsoft.com/kb/330174
Special Thanks to:
You, dear visitor, for spending your time reading my articles,
My friends and family for supporting and motivating me,
and all people who contributed to this article with their comments, experiences and critics.


